Writer: Pro-Tec Athlete Champion Ultrarunner Dylan Bowman
I’ve been an athlete my entire life. Before I devoted energy to running in my early 20’s, I’d played pretty much every sport under the sun, and luckily managed to remain remarkably injury free. In fact, looking back at my youth through collegiate athletic career, I can’t think of a single instance where I missed a practice, let alone a game, due to a physical injury. But since I’ve been running professionally, I’ve developed a bit of an Achilles heel — my ankles.
I’ve had two severe ankle sprains in the last six years (one on each foot), which have taught me a lot about how to best approach these frustrating and stubborn injuries. The first sprain took place in August of 2013 and the second came in April of this year (2019). Below I’ve detailed the strategy I think works best should you ever confront such an injury.
Step #1: Immobilize
When I suffered a grade 3 sprain of my right ankle in the summer of 2013, the conventional wisdom at the time was to re-introduce movement right away in an effort to keep range of motion and strength in the joint. I wasn’t given crutches or instructed to immobilize my foot using a cast or boot for any period of time. Since then, and even with years of physical therapy exercises, my right ankle still feels a bit unstable as a result of the injury.
When I sustained a very similar injury to my left ankle this year, I received the opposite advice. A podiatrist and family friend in Portland named Elliot Michaels schooled me on the importance of immobilization during the acute phase of a severe ankle sprain. Elliot happens to be a lifelong runner himself and has dealt with hundreds of similar cases over the course of his career. His philosophy is that it’s best to immobilize the damaged ligaments in a shortened position during the acute phase of healing due to the stretching and tearing that occurs during a classic ankle sprain. By allowing the stretched/torn ligaments to heal in a shortened position, the idea is that you will mitigate some of the chronic instability that often occurs after ankle sprains. For the injury of my left ankle, I was non-weight bearing on crutches for 10 days and in a walking boot for another 5 days, before I down-sized to a smaller ankle stability sleeve. So the ankle was pretty much immobilized 24hrs /day for about two weeks immediately following the injury. I think taking this approach has made a big difference relative to my previous injury of the right ankle.
Step #2: Support and Massage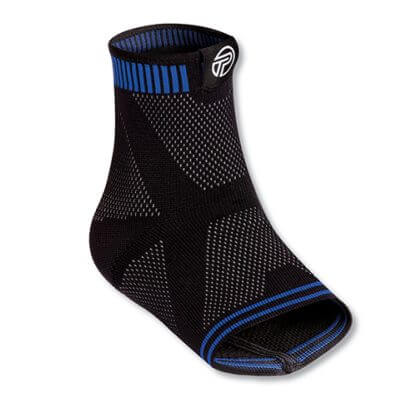
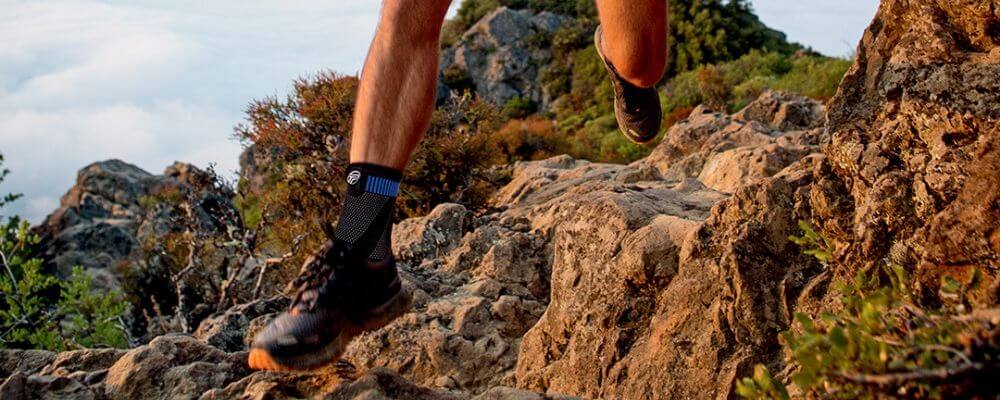
Once I removed the boot, I still gave the injured ankle the support it needed during the conservative return to daily activity. I’ve used the Pro-Tec 3D Ankle Support product while running for years, but it is equally useful in daily life following an ankle sprain. Like the boot, I wore the 3D Ankle Support everyday for about two weeks following the boot, whether I was walking around town or laying on the couch. The compressive nature of the sleeve helps to keep swelling down while giving me a feeling of support and a bit more confidence in the stability of my foot.
If the 3D Ankle Support wasn’t on at a given time, it likely meant that I was doing self-massage on my foot and ankle. Grade 2 and grade 3 inverted ankle sprains are usually marked by insane swelling for a remarkably long period of time. Minimizing that swelling really helps with range of motion, strength and general healing of the joint. I used my wife’s homemade CBD lotion, Blue Willow, and would do 10-20 mins of self-massage to get the swelling out of my foot and ankle 2-3 times/day. The technique was not complicated, I’d simply rub the swelling upwards, out of my foot and ankle, focusing on the whole area, not just the specific location of my injury. When I finished the massage, I’d put the 3D Ankle Support back on and went about my day.
Step #3: Work on dorsiflexion and stretch your calves
After my ankle injury this spring, I had the luxury of travelling down to the Red Bull headquarters in Santa Monica, CA to do some rehabilitation work with the high-performance team. The resident body work wizard there, Marco Milano, opened my eyes to an anatomical vulnerability that left me very susceptible to severe ankle injuries – lack of dorsiflexion. Dorsiflexion is the range of motion your foot has moving back towards your shin. When your ankle joint and calves are locked up, you have compromised dorsiflexion. When your foot doesn’t have the ability to move back towards your shin, and it’s forced into that position, the only option is for it to roll outward, leading to a classic inverted ankle sprain. When you have chronic tightness in this area like me, these sprains tend to be serious. I now do dorsiflexion exercises at home every day and often spend time in the Pro-Tec Night Splint which produces better dorsiflexion by prolonged placement of the foot in a dorsiflexed position.
In addition to the night splint I focus on keeping my feet and lower legs as loose as possible using the Extra Firm Foam Roller on my calves and Plantar Massage Balls on my feet. I also stretch my calves daily using the Pro-Tec Calf Stretcher, which has really helped with improving my dorsiflexion. Keeping the feet and lower legs soft and supple is the best way to prevent serious ankle injuries. Working on this has become my life’s mission every day in the aftermath of two such episodes.
Step #4: Rebuild strength and proprioception
Once your foot and ankle have recovered sufficiently, it’s important to re-introduce strengthening and proprioception exercise for joint stability. As I mentioned, people who suffer severe ankle injuries often struggle with chronic instability of the joint, leaving them susceptible to repeated future injury of the area. This has certainly been the case for my right foot and something that I’m determined to not repeat with my left. The answer is to keep the ankle mobilized and strong, so that it recovers as close to 100% functionality as possible.
Proprioception is your brain’s ability to communicate with your body effectively. In this case, I’m referring to my brain’s ability to have perception and awareness of where my foot is in space during activity. I work on this by doing single-leg balancing exercises and resistance band exercises using the Pro-Tec Resistance Bands. Once I can do them with my eyes open, I progress to doing them with closed eyes, enhancing the proprioceptive quality of the rehab session. These proprioceptive exercises have the added benefit of enhancing the strength of the joint, both of which will help return functional stability to the foot and hopefully reduce the risk of future injury.
Step #5: Slowly return to sport
I’m not going to lie, ankle sprains are frustrating and require immense patience and diligence in recovery. Grade 3 sprains, which I’ve sustained twice, take three months or more to heal to a place resembling 100%. Understand and accept this fact. Trying to rush this recovery can lead to compensatory injuries elsewhere and generally delay your return to health. Trust me, I’ve learned this the hard way.
Of course, that doesn’t mean you have to take 3 months completely off. To the contrary, reintroducing your activity of choice, using pain as your guide, should help enhance the strength of the injured joint, so long as you aren’t doing too much. Ask your doctor (preferably a podiatrist who’s also a runner) about when it’s safe to return to activity and how you should approach your progression in training. I’d also recommend continuing to wear the 3D Ankle Support for about three months after the injury just to continue giving the compromised joint a bit more stability to avoid a re-aggravation.
Good luck in your recovery! I feel your pain. If you follow these steps, trust me, it will get better!
Want sports medicine news and information delivered straight to your inbox?
By submitting this form, you are consenting to receive marketing emails from: . You can revoke your consent to receive emails at any time by using the SafeUnsubscribe® link, found at the bottom of every email. Emails are serviced by Constant Contact